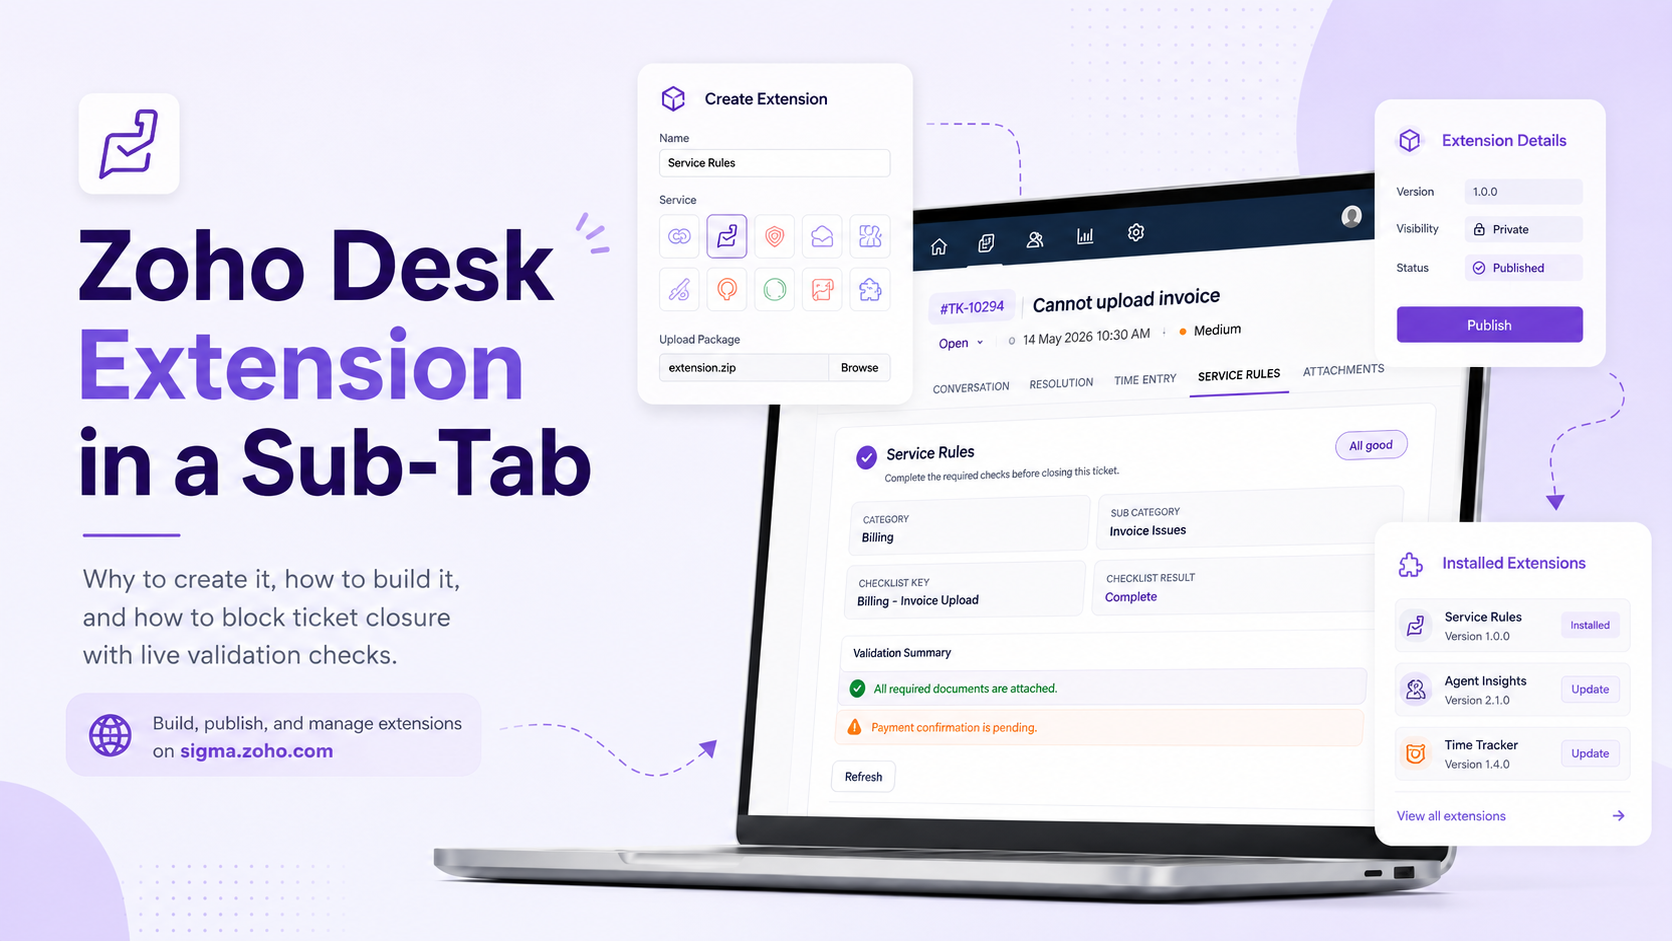
How to Build a Zoho Desk Extension That Shows Ticket Validation Results in a Sub-Tab
Fri May 08 2026
Zoho Desk · Sigma · Extensions
How to Build a Zoho Desk Extension That Shows Ticket Validation Results in a Sub-Tab
Build a Zoho Desk extension in Sigma, place it inside the ticket detail view, and show agents live validation results before they close a ticket.
If your support team works with mandatory fields, approval rules, or customer-specific checks, agents often need a quick way to understand why a ticket cannot be closed.
A Zoho Desk extension is a practical way to solve this. Using Zoho Sigma, you can build a custom extension, place it inside the ticket detail view, and show live validation results directly to the agent. Sigma provides a cloud editor for building extensions, pre-populates the service manifest for the Zoho product you choose, and lets you test your work using the Run action in the editor.
Use a sub-tab for
- Clear checklist messages
- Missing contact, account, category, or custom fields
- Agent-friendly validation summaries
Why create a Zoho Desk extension for ticket validation?
A ticket validation extension helps agents see closure blockers in one place. Instead of guessing why a process failed, they can open a dedicated ticket sub-tab and immediately see the missing items.
- Contact is missing
- Account is missing
- Category or sub-category is missing
- A required custom field is empty
- The selected company does not match the expected company
- A proof document or required attachment is still missing
Zoho Desk extensions are built around widgets, and widgets can be placed in several locations. One of those locations is desk.ticket.detail.subtab, which appears in the ticket detail page under the More icon and opens the widget in the full sub-tab area of the ticket.
Step 1: Prepare the extension files and ZIP package
Before you create the extension in Sigma, prepare the extension package locally. Sigma expects you to upload a ZIP file, so the widget files and manifest should already be ready.
At a minimum, your extension needs:
- A
plugin-manifest.jsonfile - A widget page such as
app/widget.html - Optional icon and logo files under
app/img - A ZIP file that contains the manifest and app folder at the ZIP root
Recommended file structure
case-checklist-extension/
|-- plugin-manifest.json
+-- app/
    |-- widget.html
    +-- img/
        |-- icon.png
        +-- logo.png
Keep
plugin-manifest.json at the root of the ZIP. Do not zip the parent folder in a way that puts everything one level deeper, such as case-checklist-extension/plugin-manifest.json inside the ZIP.For a ticket sub-tab, the key location is:
"location": "desk.ticket.detail.subtab"
Example plugin-manifest.json
{
  "service": "DESK",
  "storage": false,
  "whiteListedDomains": [],
  "modules": {
    "widgets": [
      {
        "location": "desk.ticket.detail.subtab",
        "url": "/app/widget.html",
        "name": "Case Checklist",
        "icon": "/app/img/icon.png",
        "logo": "/app/img/logo.png"
      }
    ]
  }
}
Build a simple validation widget
To work with Zoho Desk data inside a widget, include the Desk client SDK and initialize the extension with ZOHODESK.extension.onload().
<!DOCTYPE html>
<html>
<head>
  <meta charset="UTF-8" />
  <title>Case Checklist</title>
  <script src="https://js.zohostatic.com/support/developer_sdk/v1/js/ZohoDeskClientSDK.min.js"></script>
  <style>
    body {
      font-family: Arial, sans-serif;
      padding: 16px;
      margin: 0;
      background: #ffffff;
      color: #222;
    }
    .card {
      border: 1px solid #e5e7eb;
      border-radius: 12px;
      padding: 16px;
    }
    .ok {
      background: #ecfdf3;
      color: #166534;
      padding: 12px;
      border-radius: 10px;
      margin-top: 12px;
    }
    .issue {
      background: #fef2f2;
      color: #991b1b;
      padding: 12px;
      border-radius: 10px;
      margin-top: 8px;
    }
    .muted {
      color: #6b7280;
      font-size: 14px;
    }
    button {
      margin-top: 16px;
      padding: 10px 14px;
      border-radius: 8px;
      border: 1px solid #d1d5db;
      background: #fff;
      cursor: pointer;
    }
  </style>
</head>
<body>
  <div class="card">
    <h2>Case Checklist</h2>
    <p class="muted">Shows missing items and why the ticket cannot be closed.</p>

    <div id="summary">Loading...</div>
    <button onclick="loadChecklist()">Refresh</button>
  </div>

  <script>
    function renderIssues(ticket) {
      var issues = [];

      if (!ticket.contactId) {
        issues.push("Contact is missing.");
      }

      if (!ticket.accountName) {
        issues.push("Account is missing.");
      }

      if (!ticket.category) {
        issues.push("Category is missing.");
      }

      if (!ticket.subCategory) {
        issues.push("Sub-category is missing.");
      }

      var html = "";

      if (issues.length === 0) {
        html = '<div class="ok">No missing checklist items.</div>';
      } else {
        for (var i = 0; i < issues.length; i++) {
          html += '<div class="issue">' + issues[i] + '</div>';
        }
      }

      document.getElementById("summary").innerHTML = html;
    }

    function loadChecklist() {
      ZOHODESK.get("ticket").then(function(response) {
        var ticket = response.ticket;
        renderIssues(ticket);
      }).catch(function(err) {
        document.getElementById("summary").innerHTML =
          '<div class="issue">Unable to load ticket data.</div>';
        console.log(err);
      });
    }

    window.onload = function() {
      ZOHODESK.extension.onload().then(function(App) {
        loadChecklist();
      });
    };
  </script>
</body>
</html>
The ticket detail APIs in Desk widgets let you fetch the current ticket using ZOHODESK.get("ticket"). The returned ticket object can include values such as accountName, category, subCategory, contactId, and custom fields under cf.
Create the ZIP file
From inside the extension folder, zip the manifest and app folder together. The ZIP file is what you upload in Sigma.
cd case-checklist-extension
zip -r ../case-checklist-extension.zip plugin-manifest.json app
Step 2: Upload the ZIP and create the extension in Sigma
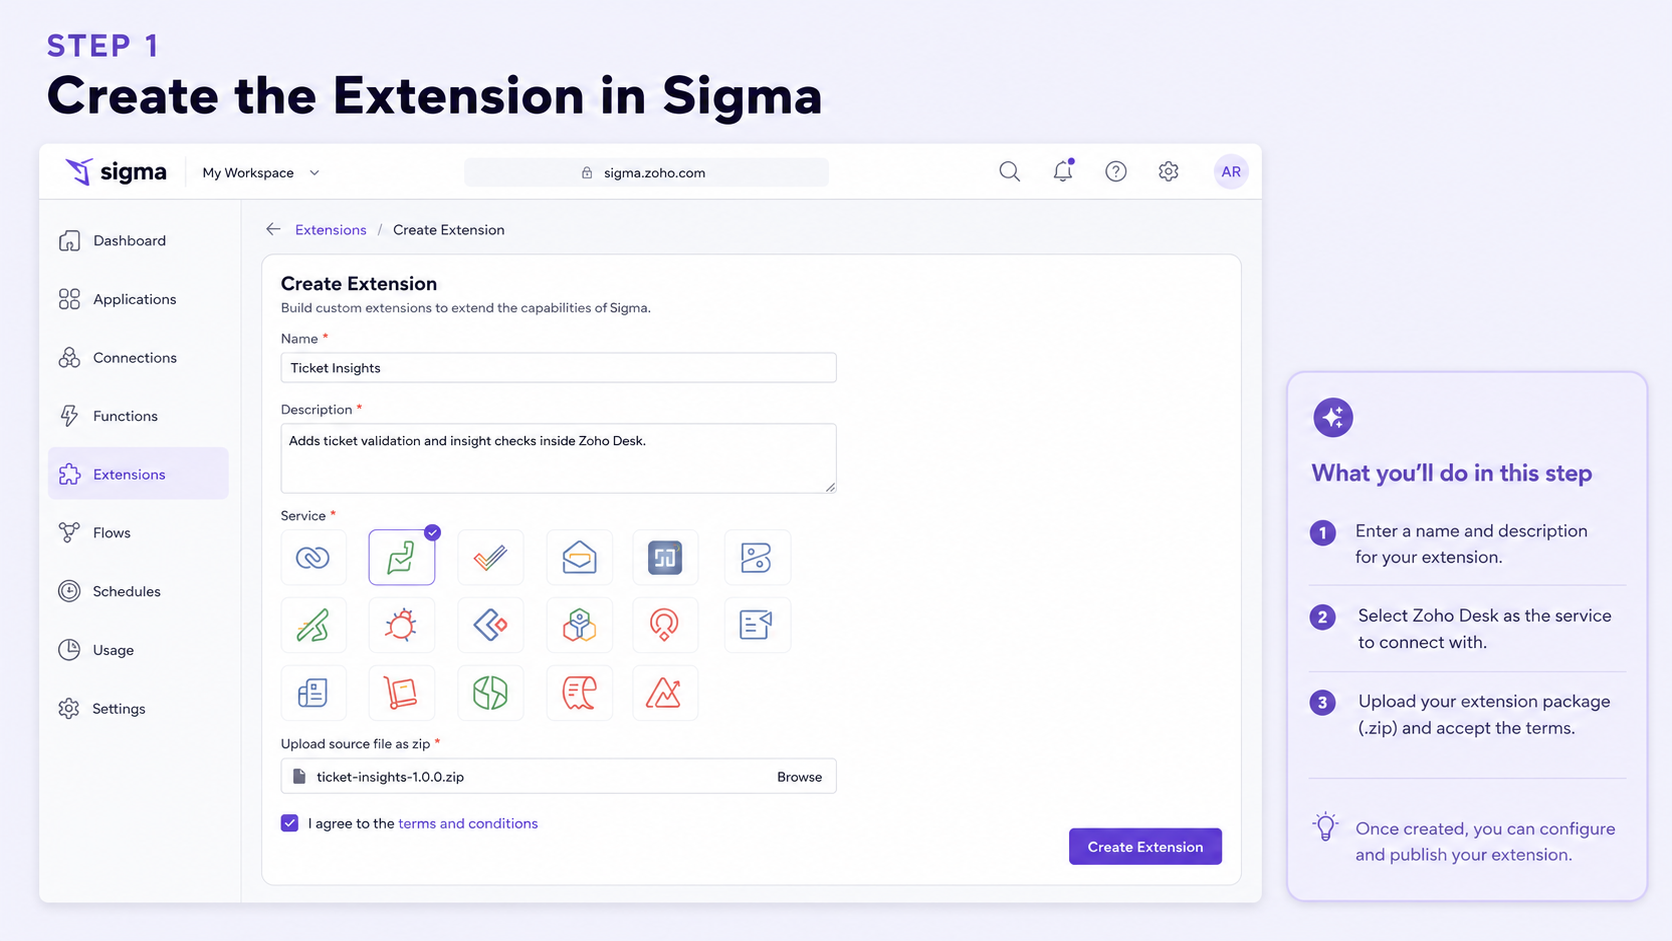
Go to sigma.zoho.com, create a new extension, select Zoho Desk as the service, upload the ZIP package, accept the terms, and create the extension.
Step 3: Publish and copy the install link
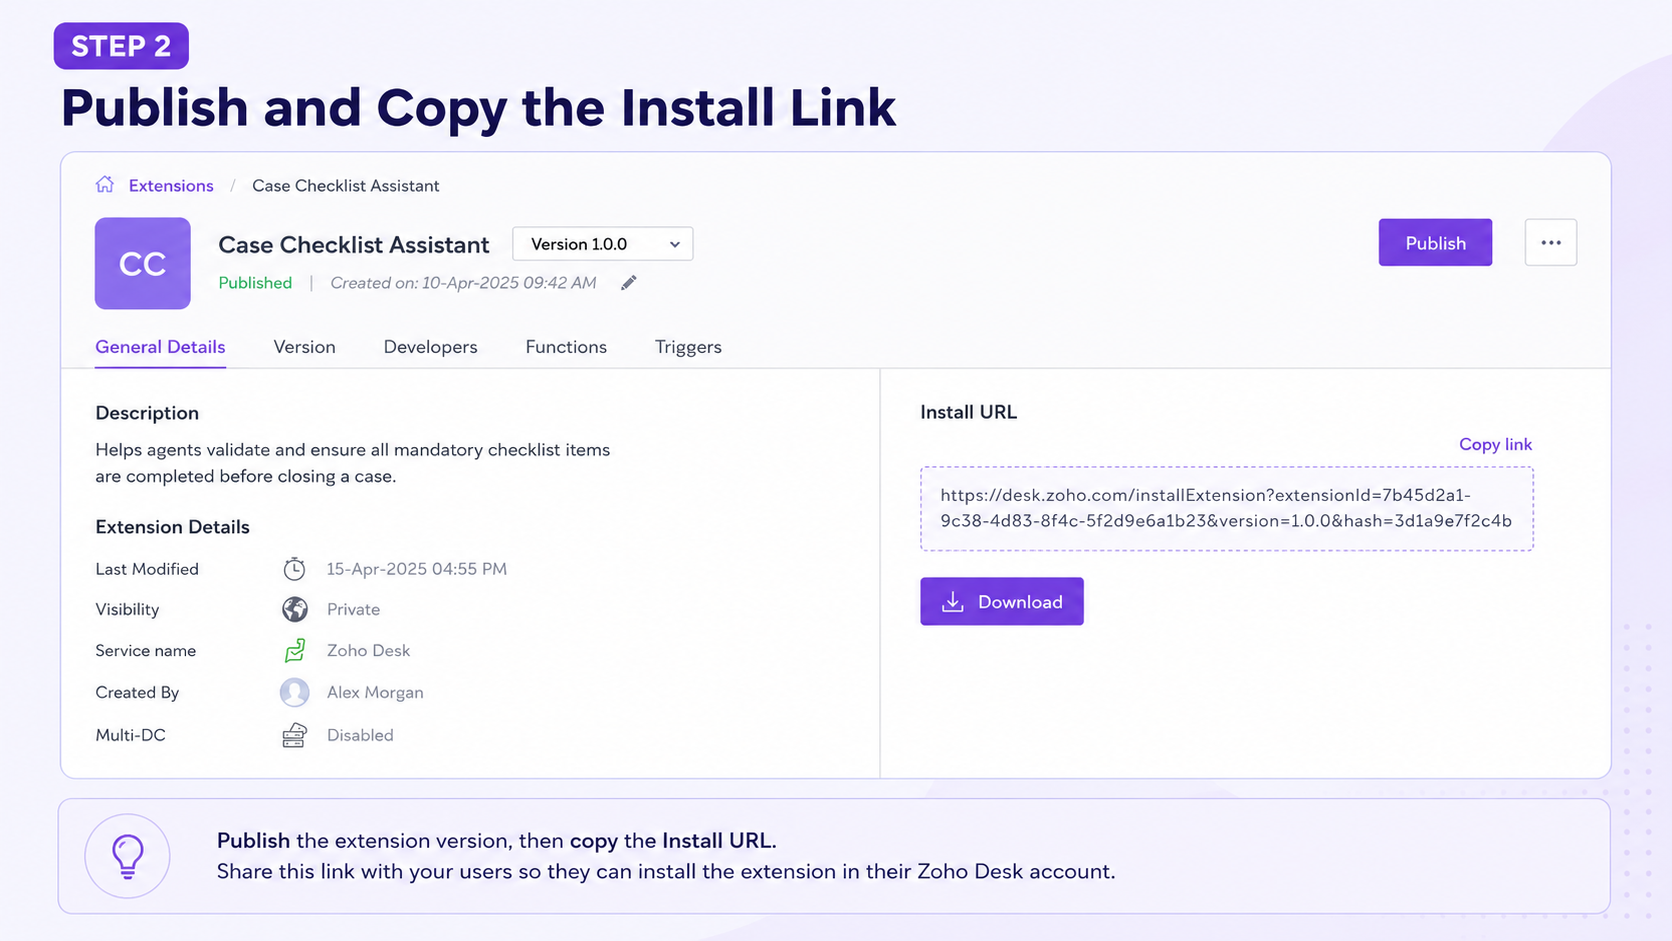
If you are building a private extension, publish the extension version in Sigma, then copy the generated install URL. Share that link with the users or admins who need to install the extension in Zoho Desk.
Step 4: Install the extension in Zoho Desk
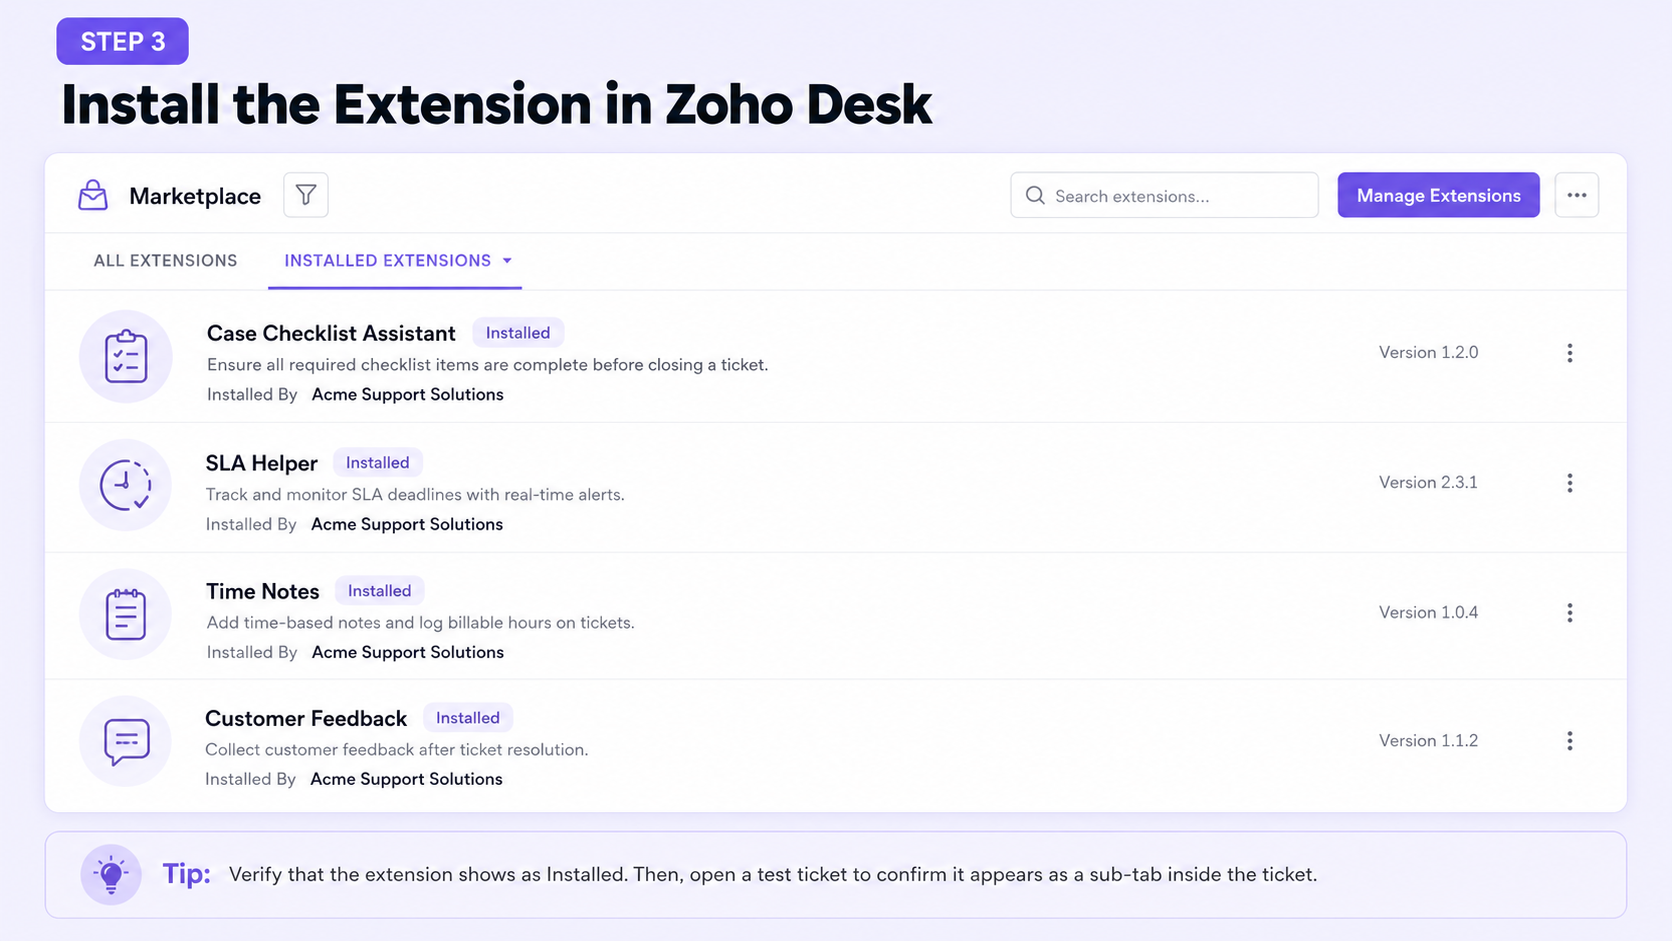
Use the install URL in the target Zoho Desk portal. After installation, verify that the extension appears as installed, then open a test ticket and confirm the widget is available as a ticket sub-tab.
Step 5: Show validation results inside the ticket

Test with tickets that have missing data and tickets that are fully complete. The sub-tab should show either a success message or a clear list of missing checklist items.
- A ticket with no contact
- A ticket with no account
- A ticket with a missing category
- A ticket with everything filled correctly
Showing more than just missing fields
A good validation widget should do more than say something is wrong. It should tell the agent exactly what is missing and why it matters.
- Contact is missing
- Account is missing
- Selected company does not match the requester
- Tax ID is blank
- Proof document is not attached
- Category or sub-category must be selected before closure
If your process uses custom ticket fields, extend the checklist logic with the ticket's cf data and your own custom field API names.
Final thoughts
A Zoho Desk extension like this improves ticket quality without overwhelming agents. The desk.ticket.detail.subtab location is ideal for a dedicated Checklist or Validation view, and the Desk widget APIs make it straightforward to fetch ticket details such as contact, account, category, and custom fields.